Learn how to create your own Multi-Image NFT Collection from scratch with our step-by-step guide.
In this guide, we're going to show you how to create your own Multi-Image NFT Collection. Don't worry if you're new to this, we'll take you through every step of the way!
Steps
1. Access the NFTs section in Single
Log in to your Single account and head to the sidebar. Click on the NFTs section and then select "Create NFT" to get started.
2: Choose "Multi-Image Collection"
When creating a new NFT Collection, you'll see three options to choose from: Single-Image Collection, Multi-Image Collection, and Generative Collection.
Select "Multi-Image Collection" and then click "Create".
3: Upload a representative photo
Start crafting your Multi-Image Collection by uploading a photo that represents the entire collection. This image will also serve as the Shopify product image, so you’ll want to select an image that truly captures the essence of your collection.
📝 Note: The image you upload should be in .jpg, .jpeg, .png, .gif, or .tiff format and must be less than 200MB in size.
Don't worry if you don't have the perfect collection image in mind just yet. You can always switch it out later in your Shopify admin once your NFTs are generated.
4: Add a title and description
Create a title and description for your Multi-Image Collection. Your description will function as both the Shopify product description and permanent NFT metadata, so aim for simplicity and timelessness.
Take time to consider what would accurately describe your collection and make it stand out. Don't be afraid to add a touch of personality and creativity to make it more engaging for potential buyers.
📝 Note: While you can’t edit the NFT Collection metadata for title and description, you can always adjust the Shopify product title and description.
5: Add an external URL
Add an external URL to the NFT metadata. This URL will be tied to your NFT permanently (even if the NFT gets resold on the secondary market) so point it to a website you know will be around. You can use any URL, but we recommend using your Shopify URL since that's where your collection will be sold.
Simply copy and paste your Shopify URL into the designated field and you're good to go!
6: Set the price
Now it's time to determine the price of your NFTs. Take a moment to think carefully about what price feels fair to you, represents the value of your collection, and is something that your fans will be happy to pay.
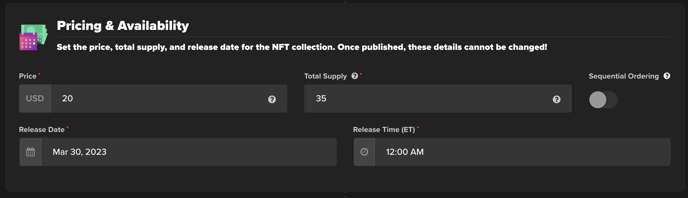
🚨 Warning: Once your collection is published, the price cannot be changed. Be sure to carefully consider your pricing before hitting that publish button, as you won’t have another chance to adjust it.
Custodial Vs Non-Custodial
To learn what this means, click here.
For information on exactly how to set up custodial NFTs, try this article.
Compressed vs Uncompressed
To learn what compression is, click here.
For information on exactly how to create compressed NFTs, try this article.
7: Set the total supply
The total supply is the number of NFTs included in your Multi-Image Collection.
And heads up! Once your collection is published, you can't change the total supply – whether via Single or your Shopify admin. So, be sure you're happy with the total supply before the collection is published.
8: Set your publish date
Choose the exact date and time when you want your collection to be made public and available for purchase.
9: Upload your images
Get creative and upload the images that you want to include in your NFT collection, naming each image uploaded as you go.

📝 Note: The names of your images will appear in the metadata of your NFTs so give them a unique and memorable name that will also stand the test of time.
10: Set the quantity
Choose the number of each image that will be included in the collection. By selecting different quantities for each image, you can create rarity and exclusivity in your collection, making it more valuable and desirable to potential buyers.
For example, you can set a lower quantity for a more unique image, and a higher quantity for a more common image.
11: Save and Continue
Once you've uploaded your images, named them, and set the quantity for each, it's time to generate the NFTs in your collection.
12: Connect your wallet
Now, it's time to connect your wallet(s). This is where funds from secondary sales will be deposited. If you add more than one wallet, you can set what percentage of shares goes to each. Keep in mind that Single takes a 5% share as a service fee.
If you don't already have a wallet for the Solana blockchain network, don't worry! We recommend using Phantom, which is user-friendly and easy to set up. You can get started with just a few simple steps here.
13: Add gated access (optional)
Step up your NFT game and add more value to your collection to increase sales. Offer gated content, pages, and products exclusively to those who purchase your NFTs.
Although this step is optional, adding rewards and incentives is always a great way to give your fans an extra reason to buy your NFTs and make them more valuable overall. Want to learn more about this? Check out our tutorial here.
14: Customize the "NFT claimed" message
Make the message that pops up when someone claims your NFT in their wallet feel more you. Add a link to your shop or where they can find your gated content, so they can check it out easily. Make sure to customize the button to match what you want them to do next, like "Shop Now" or "Access Content."
15: Bundle NFTs with other items in your shop (optional)
Ready to up your fan engagement game? Why not bundle your NFTs with other items in your store? This fun and creative approach will delight your fans, attract new customers, and introduce them to the world of NFTs.
🤔 Consider: Think about bundling your NFTs with items like t-shirts, posters, or stickers. It's a great way to create a one-of-a-kind experience for your fans and boost sales at the same time.
And yes – this step is optional, but who doesn't love a good bundle? Check out our in-depth tutorial on bundling here if you’re curious.
16: Review and publish
After completing all the steps, review everything to ensure it looks good. If you're happy with the results, click "Publish," and your Multi-Image collection will be available for sale in your store. Congratulations!
And there you have it! You've successfully created your own Multi-Image NFT collection. We hope you found this guide helpful and we can't wait to see what you create! If you have any questions or need further assistance, our support team is always here to help.