After you've published your membership, you need to add it to your store so visitors can find it, join, and see their perks. Single provides a standard page, which you can add to your navigation and be done. If you want more personalization options, read on for instructions on creating pages, page templates, and using App Blocks.
How it works
After installing Single, you'll find additional 'blocks' in your Shopify theme editor. These are essentially tools allowing you to display specific content or products from Single.
For building custom membership pages, you will be using these:
- Memberships: Tiers block
- Memberships: Exclusives
- Memberships: Account Info app block
Tip: If app blocks are new to you, see our intro guide. It'll give you a basic understanding of their function and how to use them.
Our recommendations
Here's a custom page approach we've seen work well in several stores:
- Add the Memberships: Tiers block on your store's homepage.
- Create a custom "Perks" page using the Memberships: Exclusives app block
- Create a dedicated join page and login page, then make them easily accessible by linking them in your main navigation menu.
- Add the Memberships: Account Info app block to your Customer Account page in Shopify
How to building your custom pages
Step 1 - Page creation in Shopify
To get started, you'll work with Shopify templates and the actual pages:
Templates:
- Go to Online Store > Themes in Shopify.
- Choose your theme and select Customize.
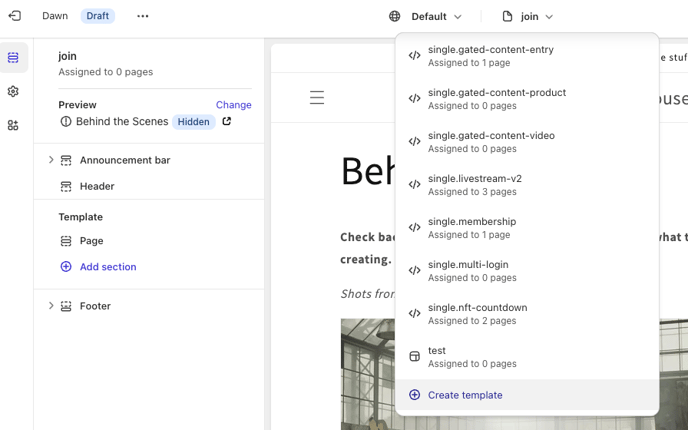
- From the drop down on the top of theme editor, choose 'Pages'
- In the pages menu, scroll to the bottom and select + Create template.
- Name your template Join and base it on 'Default page'
- Click Create template
- Repeat this process to create a second template named 'Login'
Don't worry about doing anything with the template yet. We will come back to it later.
Pages:
- From your main Shopify admin page, chose Online Store on the left menu
- In the submenu below Online Store choose Pages
- On the top right click the Add Page button
- Title the page Join
- In the bottom right, click the Theme Template drop down menu and choose the Join template you created in the steps above
- Click Save
- Repeat this process for your Login page
Step 2 - Page design in the Shopify Theme Editor
With your pages in place, you can start designing the templates. Go back to the theme editor by clicking Customize in your Online Store section. Open the menu at the top and choose Pages then [the page you want to edit].
For the Join Page:
- Add the Membership: Tiers block, allowing users to join, sign in, manage, and view their subscriptions.
- Add additional customizations to the template, like an image banner or FAQ section.
For the Login Page:
- Add the Customizable Login block.
- In the redirect field, paste your memberships page URL found in Single.
For your "Perks" page:
- Add the Memberships: Exclusives app block to a new page template
Step 3 - Add the pages to your main menu navigation
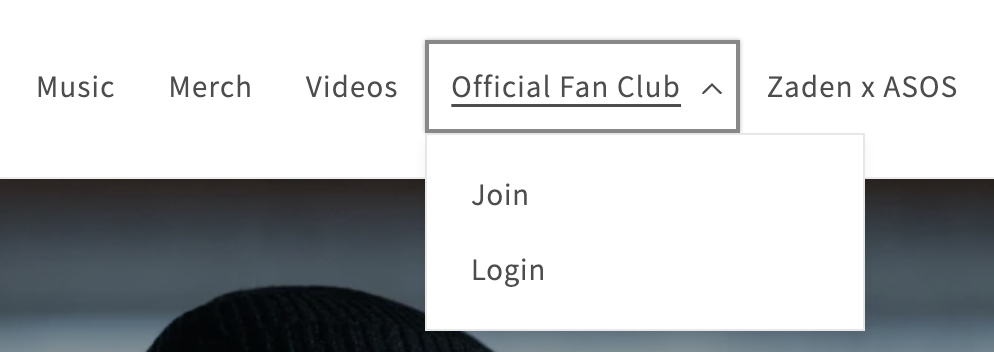
To simplify access to your membership pages, add a dedicated menu item named after your program, with dropdown options for Join and Login.
For example, if your membership is named "Official Fan Club," your navigation would look like this:
To add a menu to your navigation, follow these steps:
- Go to Online Store > Navigation.
- Click main menu in menus
- Click add menu item
- Add a name for the menu item - title it after your membership program
- Paste your Membership page url in the link field
- Click Add then Save menu
Done! Your membership is now live on your store.