Learn How to Create Your Own Generative NFT Collection on Shopify with Our Step-By-Step Guide.
In this guide, we're going to show you how to create your own Generative NFT Collection. Don't worry if you're new to this, we'll take you through every step of the way! And if you want to test the feature but don't have art ready, don't worry - we've included a zip file of sample assets at the end of the article.
Steps
Step 1: Access the NFTs section in Single
Log in to your Single account and head to the sidebar. Click on the NFTs section and then select "Create NFT" to get started.
Step 2: Choose "Generative Collection"
When creating a new NFT Collection, you'll see three options to choose from: Single-Image Collection, Multi-Image Collection, and Generative Collection.
Select "Generative Collection" and then click "Create".
Step 3: Upload a representative photo
Start crafting your Generative Collection by uploading a photo that represents the entire collection. This image will also serve as the Shopify product image, so you’ll want to select an image that truly captures the essence of your collection.
📝 Note: The image you upload should be in .jpg, .jpeg, .png, .gif, or .tiff format and must be less than 200MB in size.
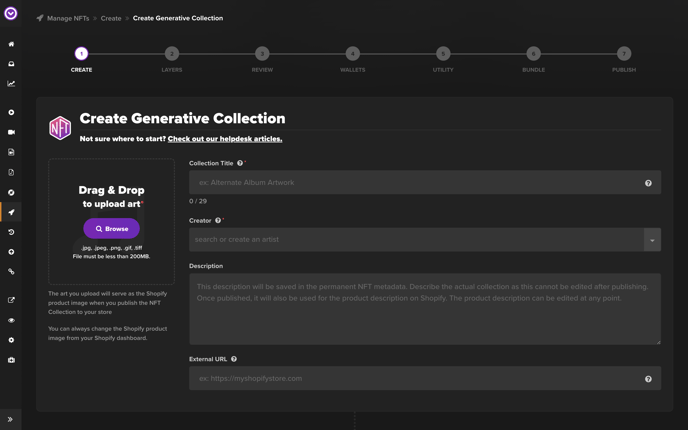
Don't worry if you don't have the perfect image in mind just yet. You can always switch it out later in your Shopify admin once your collection is generated. A popular tactic is to create a GIF that quickly rotates through the images in your collection, like the example below.
Step 4: Add a title and description
Create a title and description for your Generative Collection, along with your adding a creator name. Your description will function as both the Shopify product description and permanent NFT metadata, so aim for simplicity and timelessness.
Take time to consider what would accurately describe your collection and make it stand out. Don't be afraid to add a touch of personality and creativity to make it more engaging for potential buyers.
📝 Note: While you can’t edit the NFT Collection metadata for title and description, you can always adjust the Shopify product title and description.
Step 5: Add an external URL
Add an external URL to the NFT metadata. This URL will be tied to your NFT permanently (even if the NFT gets resold on the secondary market) so point it to a website you know will be around. You can use any URL, but we recommend using your Shopify URL since that's where your collection will be sold.
Simply copy and paste your Shopify URL into the designated field and you're good to go!
Step 6: Set the price
Now it's time to determine the price of your NFTs. Take a moment to think carefully about what price feels fair to you, represents the value of your collection, and is something that your fans will be happy to pay.

Custodial Vs Non-Custodial
To learn what this means, click here.
For information on exactly how to set up custodial NFTs, try this article.
Compressed vs Uncompressed
To learn what compression is, click here.
For information on exactly how to create compressed NFTs, try this article.
🚨 Warning: Once your collection is published, the price cannot be changed. Be sure to carefully consider your pricing before hitting that publish button, as you won’t have another chance to adjust it.
Step 7: Set the total supply
The total supply is the number of NFTs included in your Generative Collection. Make sure to decide on a total supply that it aligns with the uniqueness and rarity of your collection. And heads up: Once your collection is published, you can't change the total supply – whether via Single or your Shopify admin. So, be sure you're happy with the total supply before the collection is published.
Step 8: Add layers and traits
Now it's time to get creative! In this step, you'll be adding layers and traits and connecting them to generate unique NFTs. Generative NFT Collections are randomly generated by combining these assets.
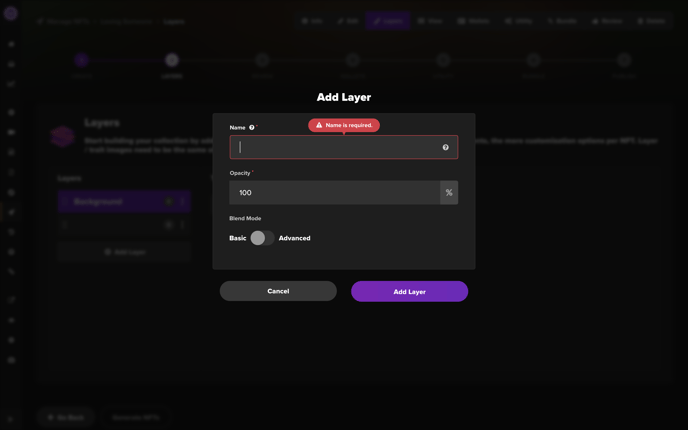
Opacity controls how transparent or opaque each layer is, and for now, you can keep it at 100 to stack layers on top of each other without any transparency. If you're feeling adventurous, advanced creators can experiment with "Advanced" blend modes.
🔑 Key point: The more layers and traits you add, the rarer and more exclusive your NFTs will be. Make sure to add enough combinations so that each NFT is unique and the total number of combinations matches the total supply you set in Step 7 (if they don’t match, you can always go back and change the supply).
Step 9: Upload trait photos and title them
Upload trait photos and ensure that they are the same size and ratio. Then, give each trait a catchy title that fits with your collection's theme.
📝 Note: Remember, names of layers and traits will appear in the metadata of your NFTs so give them a unique name. Check out examples on Devnet, the Phantom wallet, and Magic Eden.
In this step, you can also adjust the weight for each trait to control how often it appears in the final NFTs. This creates unique and rare NFTs that fit your theme.
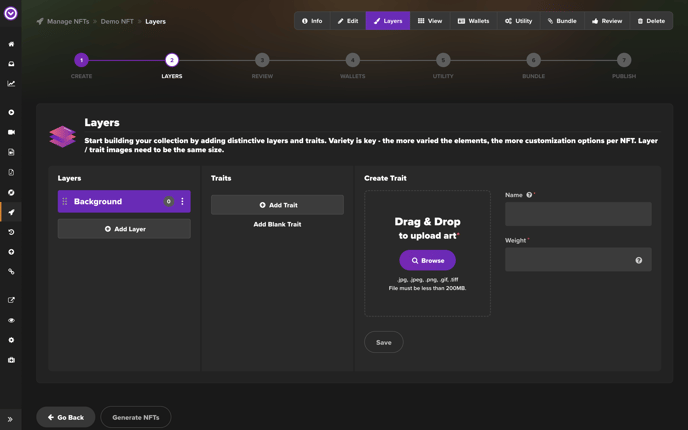
For example, a trait with an 80% weight is more likely to appear than one with a 20% weight.
Step 10: Set the order of layers and traits
To arrange the order of your layers and traits, simply drag and drop them until you're happy with the result. Before generating your NFTs, preview your collection to make sure it looks good.
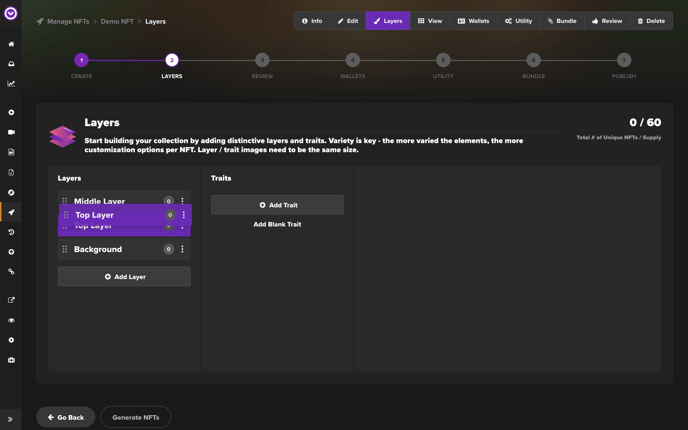
🚨 Warning: Keep in mind that the order of your layers matters! The layer on top will be visible in front of the others. To avoid having a solid color block all other layers from view, make sure the bottom layer is a solid background if you have one.
Step 11: Generate NFTs
Once you've added all the layers and traits to your generative collection, it's time to generate your NFTs. Simply click on "Generate NFTs" and preview your collection.
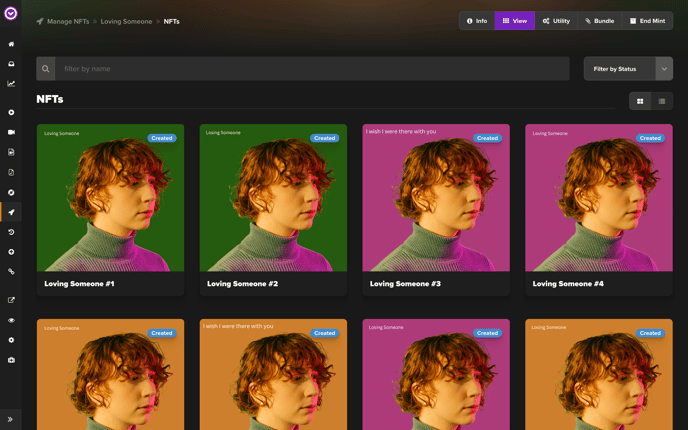
If you don't have enough traits to create all the NFTs you want, don't worry. Simply head back to Step 7 and add more layers and traits to your Collection. Alternatively, you can adjust the total supply in Step 7 to match the total unique combinations of layers and traits. Just remember, the total supply determines the number of unique NFTs in your collection.
📝 Note: To add a bit of randomness to your collection, set the supply lower than the total unique combinations. This will allow Single to randomly select NFTs from the available options.
Step 12: Connect your wallet
Now, it's time to connect your wallet(s). This is where funds from secondary sales will be deposited. If you add more than one wallet, you can set what percentage of shares goes to each. Keep in mind that Single takes a 5% share as a service fee.
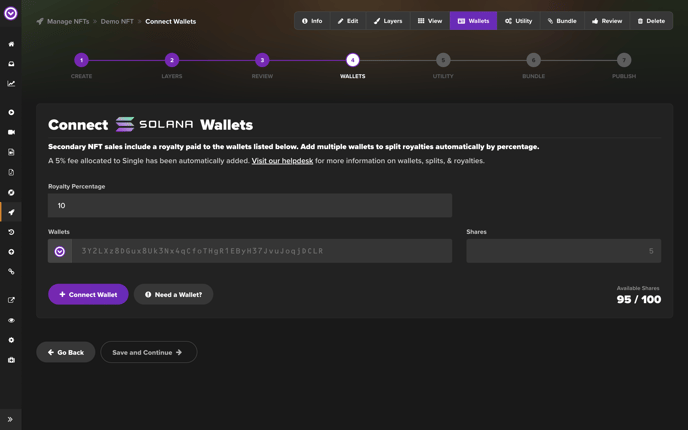
If you don't already have a wallet for the Solana blockchain network, don't worry! We recommend using Phantom, which is user-friendly and easy to set up. You can get started by just downloading it here.
Step 13: Add gated access (optional)
Step up your NFT game and add more value to your collection to increase sales. Offer gated content, pages, and products exclusively to those who purchase your NFTs.
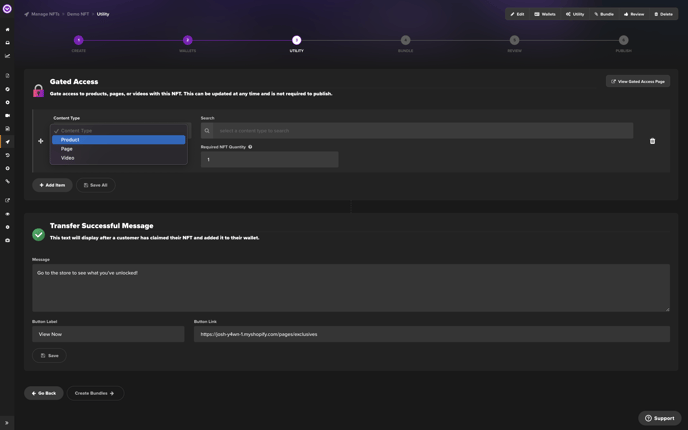
Although this step is optional, adding rewards and incentives is always a great way to give your fans an extra reason to buy your NFTs and make them more valuable overall. Want to learn more about this? Check out our tutorial here.
Step 14: Bundle NFTs with other items in your shop (optional)
Ready to up your fan engagement game? Why not bundle your NFTs with other items in your store? This fun and creative approach will delight your fans, attract new customers, and introduce them to the world of NFTs.
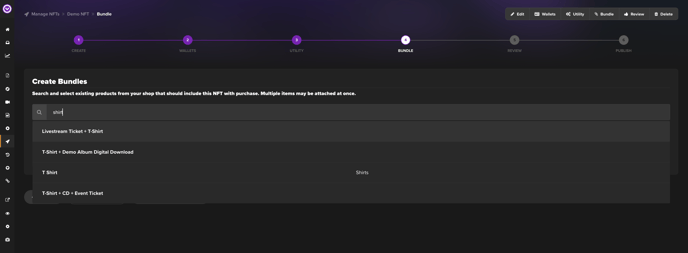
🤔 Consider: Think about bundling your NFTs with items like t-shirts, posters, or stickers. It's a great way to create a one-of-a-kind experience for your fans and boost sales at the same time.
And yes – this step is optional, but who doesn't love a good bundle? Check out our in-depth tutorial on bundling here if you’re curious.
Step 15: Review and publish
After completing all the steps, review everything to ensure it looks good. If you're happy with the results, click "Publish," and your generative collection will be available for sale in your store. Congratulations!
And there you have it! Congrats on creating your very own generative collection for NFTs! We can't wait to see what you come up with.
If you've got any questions or need further assistance, our support team is always here to lend a hand. And if you're ready to give it a try, click here to download a sample file with three background images, three text images, and one primary image!
